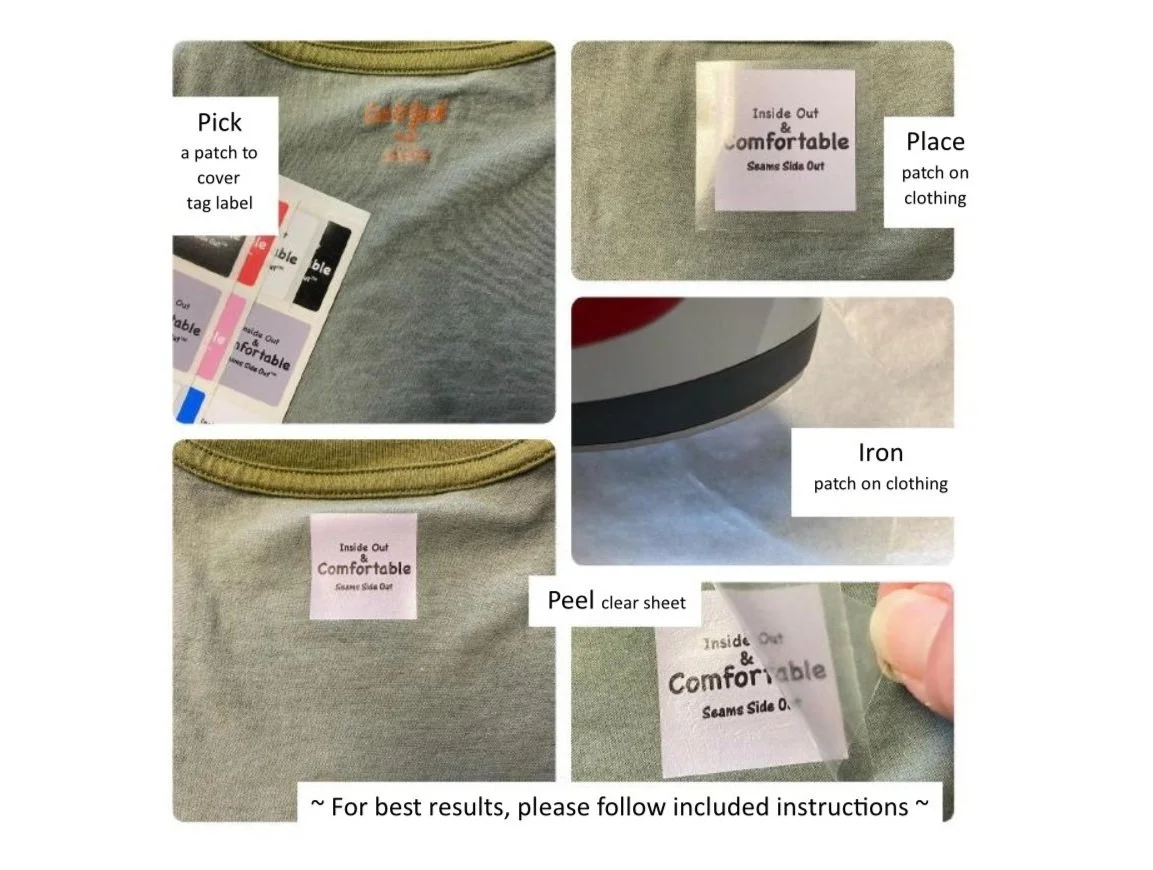
Iron-on
Dryer Safe Patches
Pre-Heat iron choosing second highest heat setting. No ironing board needed! Use a flat cookie sheet as your ironing board (this allows the heat to work on both sides of the clothing). Set up on a surface where you can push down on firmly with a lot of pressure and cover with towel or cloth to protect from heat. (1) Place clothing* flat and even on cookie sheet, making it easy to line up where you permanently want the patch. (2) Carefully cut the patch you would like to use from the book (make sure to leave enough clear carrier plastic around the patch. This helps hold it in place while ironing). (3) Iron the area where you want the patch for 5 seconds to remove wrinkles and moisture. (4) Place patch on clothing sticky side down where you permanently want it. (5) Carefully place hot iron on patch and apply constant, still, firm pressure for about 20 seconds. Then slowly move iron using the front tip of the iron and slowly iron all areas of the patch (time will vary, you should notice the material texture showing behind the patch as its permantly adhearing to the clothing). (6) It’s hot! Carefully lift a corner of the clear carrier plastic and check to see if the patch is completely sealed to clothing. (If any edges lift, stop removing clear plastic, press back down and repeat process with front tip of iron pressing firmily.) (7) When clear carrier plastic is completely peeled off, place enclosed parchment paper on patch, completely covering it. (8) Carefully hold in place and iron patch for 20 seconds. (9) Allow patch to cool for 10 minutes. Your clothing is now ready to wear... Inside out! For the best results wait 24 hours before washing clothing, with patch side in. Dry with medium heat, if needed, iron patch side in. *Be sure to check clothing instructions for high heat iron compatability before ironing patch (not all material can handle high heat ironing).
Helpful Tips
It’s important to set up your ironing work area on a surface where you can push down with a lot of pressure.
Protect your working surface. Place towel or material under cookie sheet to protect your work surface from heat.
Patches are designed to permanently adhere to flat texture clothing. Fleece clothing results will vary. (If iron on directions and care instructions are followed and all edges of the patch are completely adhered, I have found that the patches do stay on fleece clothing. The patch sometimes loosen around the edges but have a very long life).
Any parchment paper will work.
DO NOT use wax paper!
Iron-on
Machine Wash only patches
Pre-Heat iron choosing no steam and heat setting between cotton & polyester (one less than maximum heat). No ironing board needed! Use a flat cookie sheet as your ironing board (this allows the heat to work on both sides of the clothing). Set up on a surface where you can push down on firmly with a lot of pressure. Place clothing flat and even on cookie sheet, making it easy to line up where you permanently want the patch. Peel patch from book (it’s ok to bend the plastic backing, sometimes it helps remove the patch). Place patch on clothing where you permanently want it. Place enclosed parchment paper over patch. Carefully hold parchment paper in place (this helps keep patch where you placed it reducing the chance of shifting while ironing). Apply constant, still, firm pressure for 20 seconds then slowly reduce pressure and move iron in slow circular motion for another 10 seconds. Repeat both steps, making sure to apply still, firm pressure again. It’s hot! Carefully lift parchment paper and check to see if patch is completely sealed to clothing. (If any corners lift repeat process using a lot of pressure and be sure to use the second highest heat setting of the iron.) Allow it to cool for 10 minutes. Your clothing is now ready to wear... Inside out! For the best results wait 24 hours before washing clothing, patch side in. Hang to dry or air fluff only. For best results DO NOT HEAT DRY!